Search Our Websites
tg
 FISHING TACKLE
Home
Online Shopping
Site Map
 PRODUCTS
SHORETHING
Kite and Kontiki Winch
Kites Only
Kite Fishing Rigs
Flounder Lights
Boat Longlines
Electric Kontikis
Spectra Lines
Beach Carts
Target Fish Hooks
TACKLE SALE
Tackle Advice
 RESOURCES
NZ Weather Forecast
NZ Tides Map
Cleaning Fish
Free Maps - Top Spots
Catch Reports
Best Knots
Angling Articles
How To Instructions
Pictures Of Fish
 SECURITY
Online Shopping
Privacy
 NEW ARTICLES
Latest Catches
Flounder Fishing
About Us
See PFK's Facebook page and YouTube Channel for Instructional Videos and the latest Catch Reports

Five Easy Ways To Order

Online Shopping

Visit our Fishing Tackle Online Store.

Visit Our Shop

39A Neilson St
Onehunga
Auckland
Ph 634-5005

Mail Order

Ph 634-5005

Where We Are

Map of Onehunga

Contact Us

Use the form on the bottom of every page

We Take Your Privacy Seriously

Click below for more info. Privacy Policy

Paul's Fishing Kites Copyright © 2002-2016 

Buy Online
Buy Online
Kite Rigs and Boat Longlines Kite Parts and Flounder Lights

ShoreThing
Kites Only
Large Kite Rigs
Medium Kite Kit
Small Kite Rigs
Kite Longlines
Boat Longlines
Kite Parts

Flounder Lights
Traces/Clips
Hooks/Weights
Kontiki Stuff
Mainlines etc
Beach Reels
Spectra Lines
Online Store

Inflatable Fishing Kite Instructions
To get the most fishing time from your new fishing kite please take the time to read these instructions.

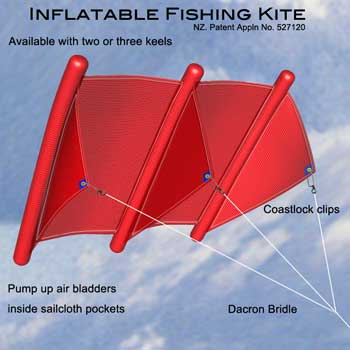
The Inflatable kite range is very powerful and efficient, so before flying the kite we suggest you check your kite line for nicks and scuffs (replace if necessary) and fit the coastlock clip supplied with this kite to the end of your kiteline.

Do not use the old type snap clip or swivels for attaching the kite to the kiteline or on any joins on your fishing kite rig.

Both swivels and snap clips are too weak to hold the new inflatable kites.

If this is your first inflatable kite we suggest you also purchase a kite pump from Paul's Fishing Kites.

A kite pump makes the task of inflating the kites much easier and gives a more even pressure in the air bladders.

Your parcel includes:

  • One Inflatable kite fitted with air bladders
  • Three spare air bladders
  • One pre-tied dacron bridle wound onto a corflute card
  • Three deflating straws
  • One coastlock clip for your kiteline
  • Instructions


Inflating the Kite Manually

Make sure the bladders are fully inside the kite. If you are blowing the kite up manually, cut 50mm off each deflating straw and insert into the valve so that around 10mm is left protruding (this keeps the lip of the valve open). Then inflate as you would a balloon.

You will notice that the non-return valve prevents the air from escaping when you stop blowing and this makes it easier to get a good pressure in the bladders.

If you blow each bladder up as hard as you can, all the bladders will have about the same pressure. It is impossible to damage the kite if you are inflating by mouth.

If you are having trouble putting the straw in the kite, look closely and you will see that one lip of the valve is cut off lower than the other and you may be trying on the wrong side.

Cutting the straw at an angle can also help make insertion easier.

With a Kite Pump

Make sure the bladders are fully inside the kite. Contrary to logic, over-inflating the air bladders so they are drum tight and the struts completely rigid does not improve the performance of the kite, it will cause the pockets to bow, spoil the aerodynamics of the kite and the light wind performance will be severely reduced.

The air bladders are slightly larger than the pocket on the kite as this reduces the stress on the air bladder and stops it stretching or rupturing if over inflated. All the air pressure is carried by the stitching on the kite so over-inflating the bladder can put excessive force on the kite stitching and/or stretch the pocket.

Insert the nozzle of the pump into the valve and pump until the creases disappear from the pocket then stop and feel the pressure by squeezing the pocket between your index finger and thumb.

If the kite is at the right pressure a moderate squeeze should be sufficient to allow the fingers to touch each other. If the pockets are starting to bow the pressure is too high and a straw should be fully inserted into the valve to let some of the air out.


Flying the kite

Take the coastlock clips from under the bridle on the the corflute and clip one to each keel of the kite then unwind the bridle from the card.

Remove any twists or tangles from the bridle.

The kiteline is clipped to the loop on the other end of the bridle.

Launch the kite and watch it fly for a few minutes, if the kite has a bias to the left or right the bladders may be unevenly inflated or the bridle may be tangled.

Tacking the Kite

So far we have found the most reliable method of tacking the inflatable fishing kite is to shorten one of the outside bridle legs.

Stable tacks of forty to fifty degrees have been regularly achieved during testing. If you find another method of tacking inflatable fishing kites please let us know.

If you want the kite to tack right you simply shorten the left hand bridle leg.

The simplest method is to make a slip loop and take an ice cream stick or similar sized piece of thin wood and put it into the loop.

If you use the knot and hitch as shown in the diagram on the right, it will disappear as soon as the stick is removed.

Big tacks on large inflatable kites may require three of four hitches in addition to the slip loop to shorten the bridle enough to give the desired angle of tack.

Fitting a New Bladder

Lay the kite out on a flat surface and remove the old bladder by pulling on the valve.

Fold the new bladder in half widthwise so it fits into the hole at the bottom of the pocket and push it in.

If the top of the bladder gets caught on the hem push it further with a finger inserted into the hole or use a plastic ruler.

Tacking knots for shortening the bridle

Once started keep folding the bladder in half and continue feeding it into the pocket 15Omm at a time until you reach the valve. At this point you may have to fold the last bit into three.

Make sure at least one of the corner tabs fold out to stop the bladder falling out prior to inflation.

Don't forget!

If you want the kite to fly more to the right simply shorten the left hand bridle leg as in the diagram above.

Shorten the right hand bridle if you want the kite to fly further to the left.

Check out the latest kitefishing catches here

Send in a fishing report here


We are here to help. If you need assistance please contact us below or search our websites.
Buy Online
Buy Online
Kite Rigs and Boat Longlines Kite Parts and Flounder Lights

ShoreThing
Kites Only
Large Kite Rigs
Medium Kite Kit
Small Kite Rigs
Kite Longlines
Boat Longlines
Kite Parts

Flounder Light
Traces/Clips
Hooks/Weights
Kontiki Stuff
Mainlines etc
Beach Reels
Spectra Lines
Online Store


Fishing Tackle Sale
Above: Morgan Barnes with a decent sized snapper from a Whangarei longline set that caught 21 good sized fish from 25 hooks set!

We are here to help.

Contact Us

Simply use the form on the bottom of every page

Fishing Tackle Sale On Now!

Big Savings on Quality Fishing Tackle

Check Out Our Sale Prices On Quality Fishing Tackle Here


Fishing Tackle Clearance Sale

Fishing Reports Newsletter

Find out where and when the fish are biting, best baits and more!

Our newsletters are packed full of fishing tips, fishing videos and catch photos.

Subscribe Here